Nothing in the guide matches that. Try another word, or ask us.
Video walkthrough
The full tour comes in three parts. Watch them in order the first time.
Part 1: How to Track and Manage Leads
Part 2: Using the CRM and Revenue Dashboard
Part 3: Setting Up and Customizing Your Workspace
Still not sure how it fits your outreach? Book a 20-minute demo and we'll walk you through it live.
Your first 5 minutes
- Sign up with Google (one click) or with an email and password.
- Name your workspace. A workspace holds all your leads, deals and settings. Your team joins it later.
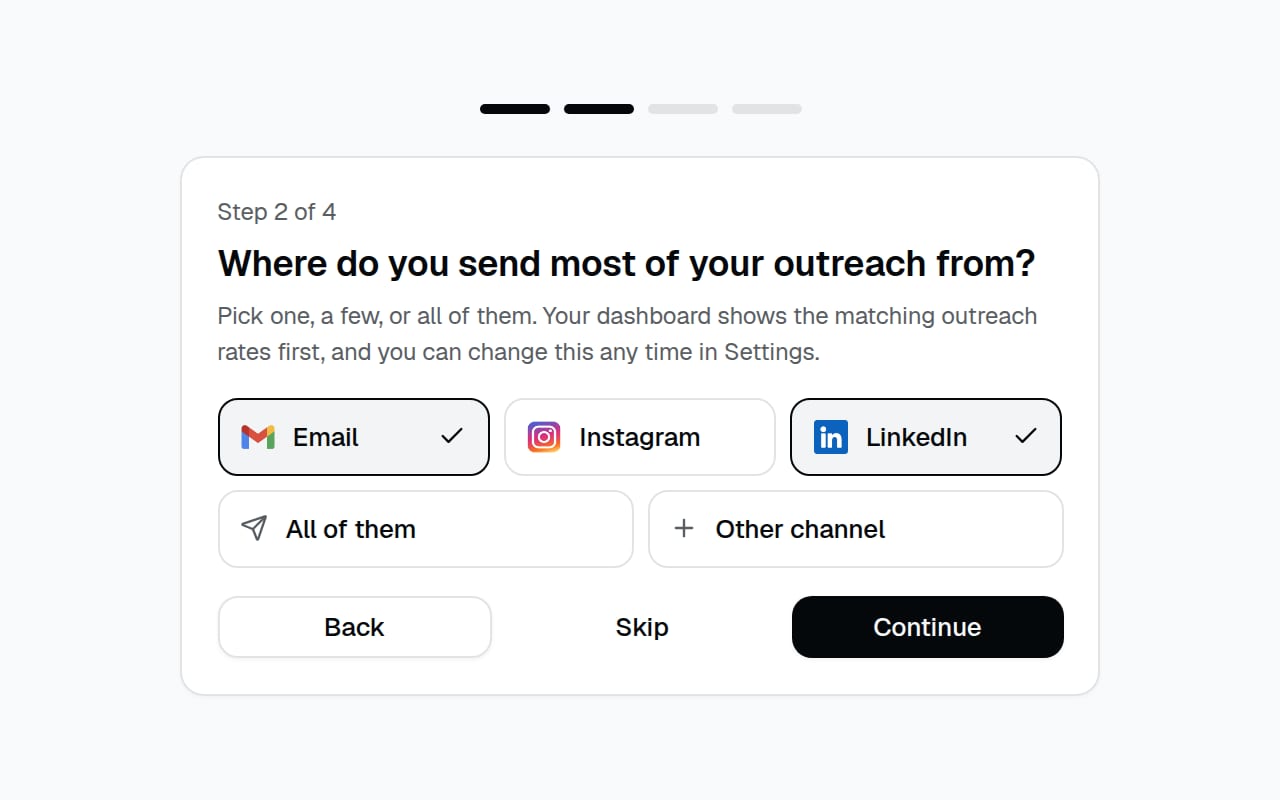
- Pick your outreach channels. Tell Tracker where you send most of your outreach from: Email, Instagram, LinkedIn, all of them, or your own (like WhatsApp or cold calls). The dashboard shows the matching outreach rates first. You can skip this and change it any time in Settings, Channels and sender accounts.
- Connect your Google Sheet. Tracker creates a sheet in your own Google Drive and keeps a copy of your leads in it.
- Watch the walkthrough and you're in.
Your workspace already has stages, the Email, LinkedIn and Instagram channels (plus any channel you added in step 3), and a list of countries, so you can add your first lead straight away. Change any of them later in Settings.
Lead Tracker and CRM
Tracker has two parts. Switch between them with the two buttons at the top of the sidebar, or press Ctrl/Cmd + 1 for the Lead Tracker and Ctrl/Cmd + 2 for the CRM.
- Lead Tracker is for prospecting: finding people, reaching out, and following up until they reply.
- CRM is for deals: people who replied with interest, the value of each deal, and the money you've made.
A lead moves from the Lead Tracker into the CRM when they reply positively. See How leads get into the CRM.
Search and shortcuts
The search box at the top of every page opens the command palette: type to find a lead, a page or an action, and press Enter to go there. You can also open it with Ctrl/Cmd + K or /.
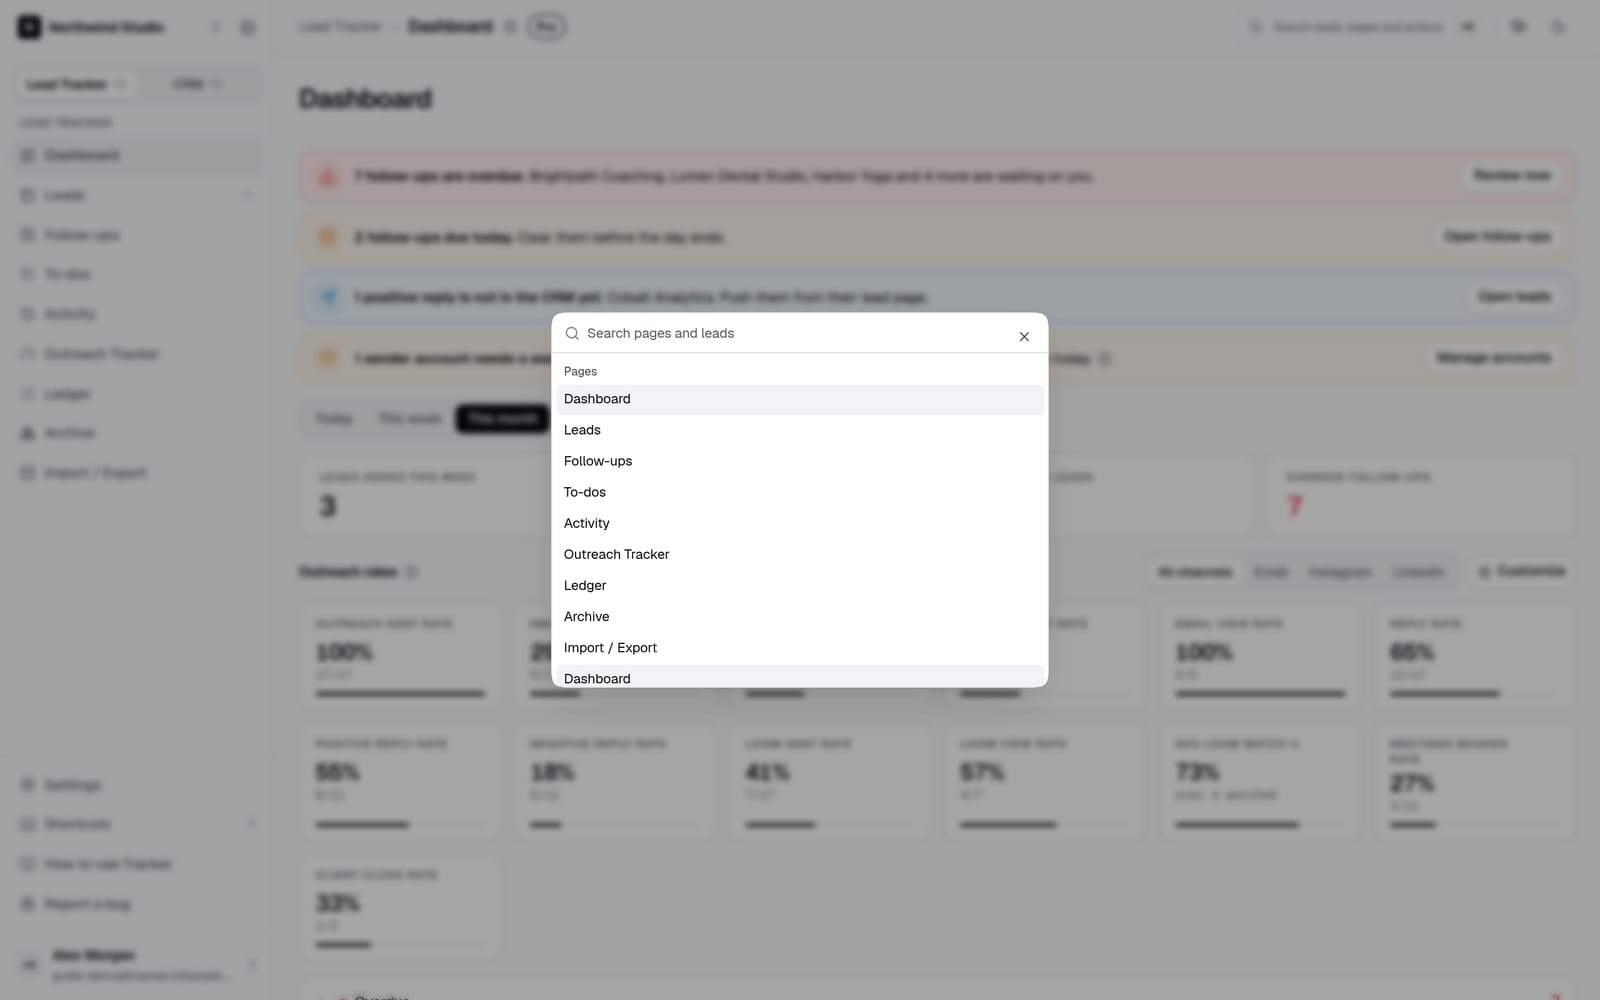
Press ? anywhere (or open your menu at the bottom of the sidebar and choose Keyboard shortcuts) to see all keyboard shortcuts. The most useful ones:
- N new lead, / search, F open filters, V switch view (table, columns, cards, calendar)
- Ctrl/Cmd + 1 Lead Tracker, Ctrl/Cmd + 2 CRM
- G then D Dashboard, L Leads, O Outreach Tracker, C CRM records, P Pipeline, R Revenue, S Settings
- On a lead: J/K next or previous lead, E edit, A archive, P push to CRM, S set follow-up date, 1 to 9 set stage
You can change the keys in Settings, Keyboard shortcuts.
Lead Tracker Dashboard
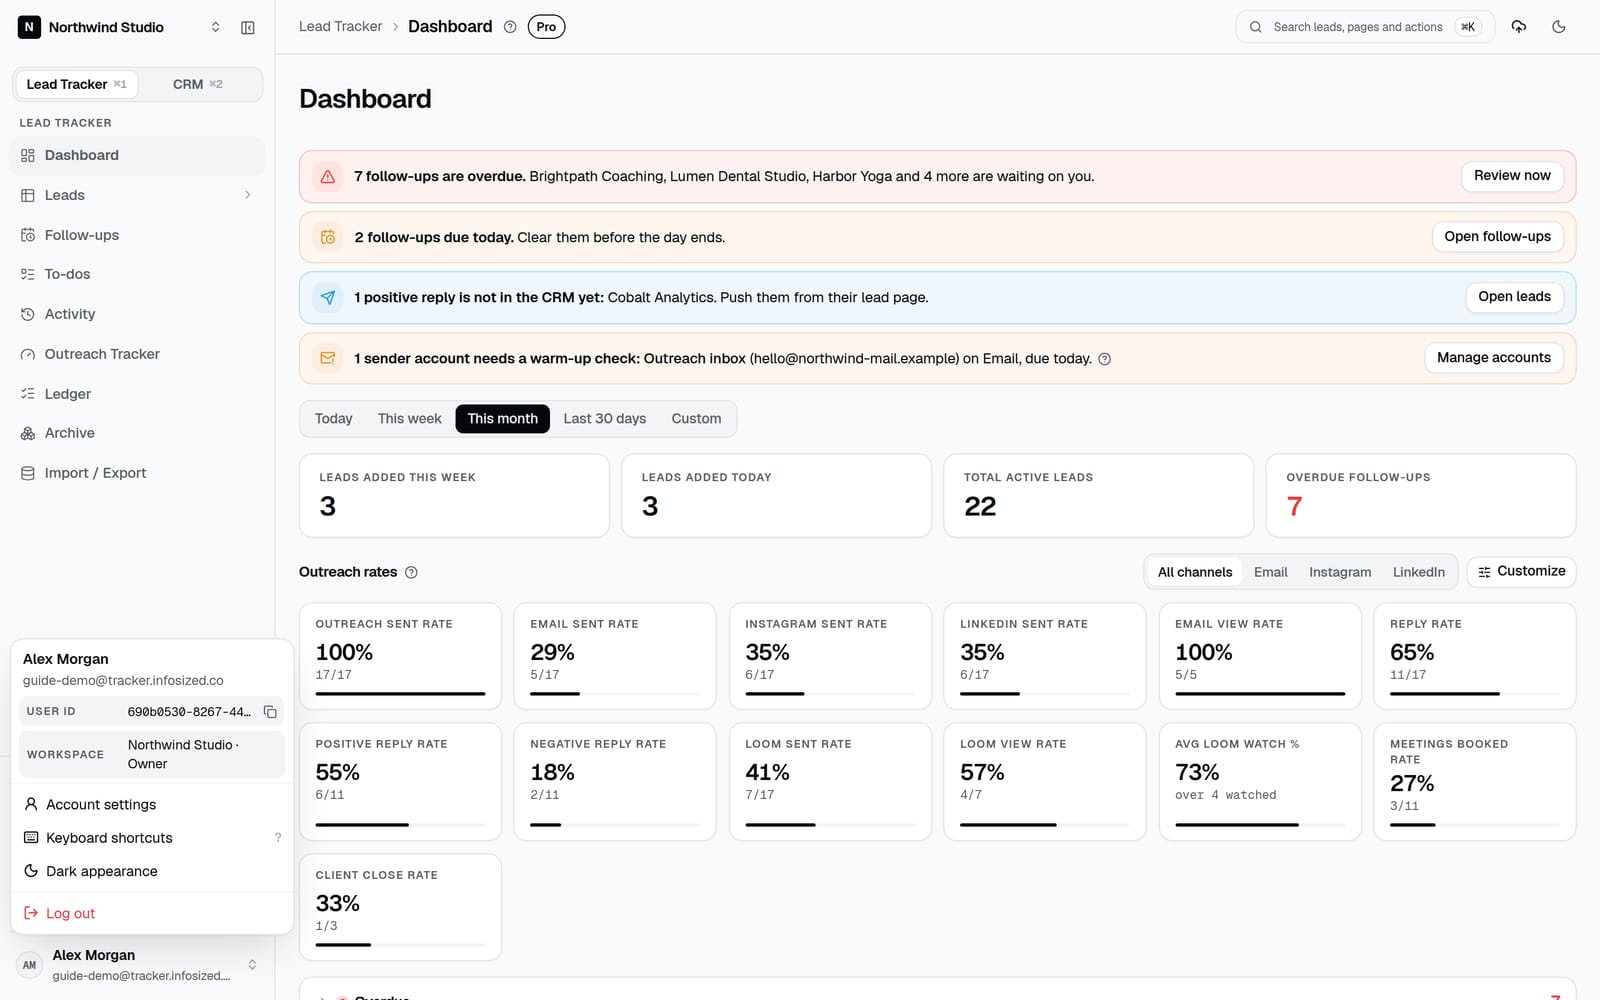
Your daily starting point. The date range (Today, This week, This month, Last 30 days or Custom) sets which leads the outreach rates are calculated from.
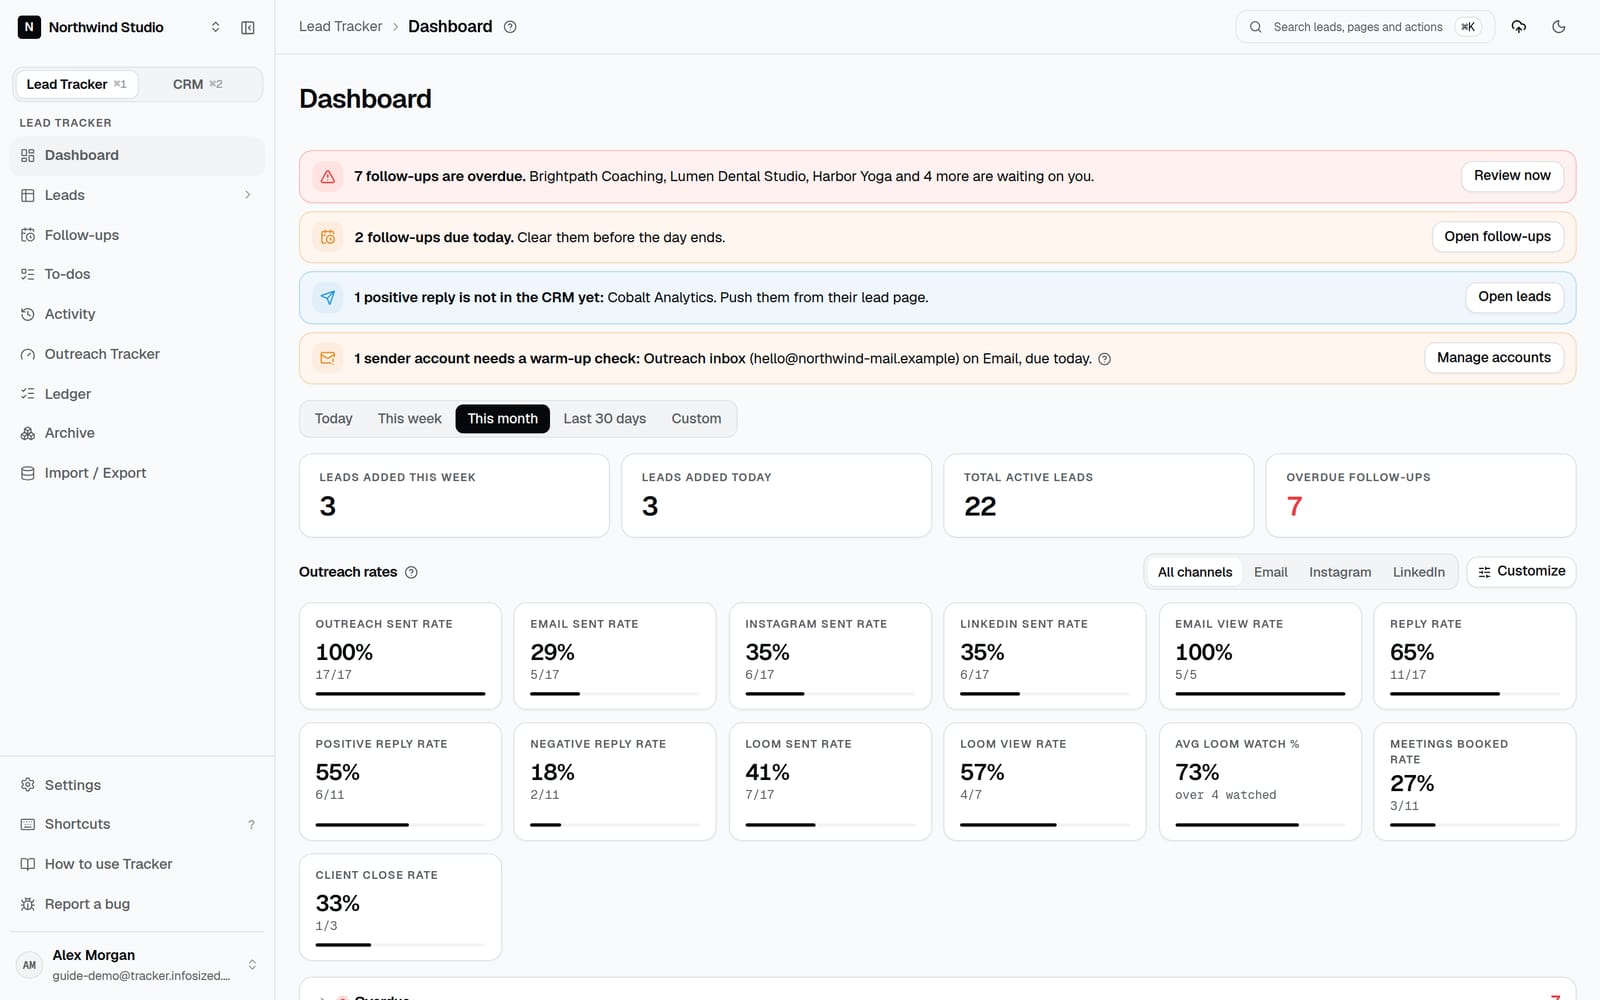
At the top, coloured alerts tell you what needs doing. Each one only shows when it applies:
- Follow-ups overdue (red), with the first few leads named.
- Follow-ups due today (orange).
- Positive replies not in the CRM yet: leads that replied with interest but haven't been pushed to the CRM. Push them from their lead page.
- Warm-up check for your sender accounts. See Warm-up check banner.
Below them:
- Leads added today / this week and total active leads (everything not archived).
- Overdue follow-ups: follow-ups whose date has passed and that aren't marked sent.
- Outreach rates: how your outreach is converting, for all channels or one channel. Each one is explained in Dashboard rates explained.
- Overdue, Due today and Upcoming (7 days): lists of leads to follow up with. Click one to open it in the side panel.
Dashboard rates explained
Each rate shows a percentage and, underneath, the actual numbers it's built from (for example 12/40). They count the leads added in the chosen date range.
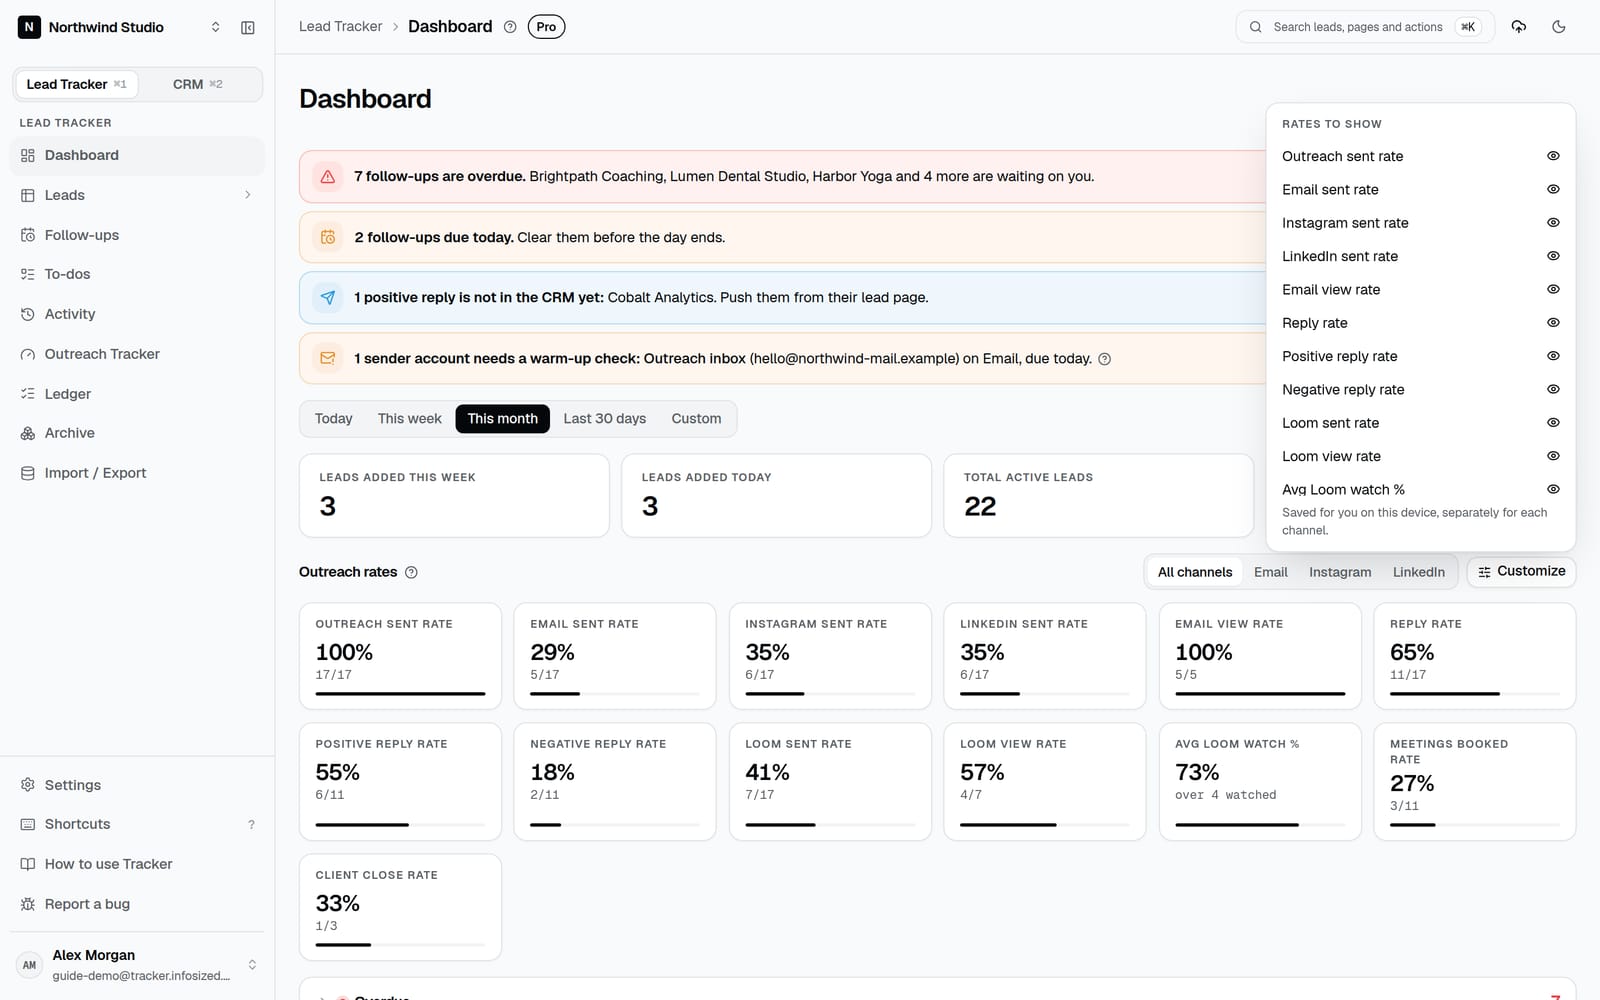
Pick a channel with the switcher above the rates: All channels, Email, Instagram, LinkedIn, or any channel you added yourself. The first time, it opens on the channel you picked when you set up your workspace (or All channels if you picked several). Tracker remembers your choice.
All channels shows:
- Outreach sent rate: leads you've messaged on any channel, out of all leads in the range.
- Email, Instagram and LinkedIn sent rate: leads you've messaged on that channel, out of all leads.
- Email view rate: emails marked as viewed, out of emails sent.
A single channel only counts leads on that channel (its channel is set to it, or you've messaged them there). Instagram and LinkedIn show their sent rate; Email adds the view rate; LinkedIn adds the Connection request rate (connection requests sent, out of LinkedIn leads). A channel you added yourself uses the lead's Contacted via and Replied on channels.
Every view then shows the same funnel:
- Reply rate: leads that replied, out of leads you messaged.
- Positive / Negative reply rate: positive or negative replies, out of all replies.
- Loom sent rate: Loom videos sent, out of leads you messaged. Loom view rate: Looms watched, out of Looms sent.
- Avg Loom watch %: on average, how much of your Loom the prospect watched.
- Meetings booked rate: meetings booked, out of replies.
- Client close rate: clients closed, out of meetings booked.
Show only the rates you care about. Hover over a rate and click the eye icon to hide it, or click Customize to hide or show any rate. Show all brings them back. This is saved on your device, separately for each channel. If you picked only some channels when setting up, the sent rates for the others start hidden.
The Instagram, LinkedIn and Email lead pages show the same rates for just that channel, with their own date range.
Read them as a funnel from top to bottom: the rate where the biggest drop happens is the step to improve first.
Warm-up check banner
New email inboxes and social profiles need to be "warmed up" (used gently for a few weeks) before you send a lot from them, or they get flagged as spam. When you add a sender account you can set a warm-up reminder date.
On that date the dashboard shows an alert naming the account, its address, its channel, and whether the check is due today or overdue. Check how the account is doing, then update or clear the reminder date in Settings, Channels and sender accounts.
Leads list
Leads in the sidebar shows every lead. Open the small arrow next to it for the Instagram, LinkedIn and Email pages (see Rapid entry).
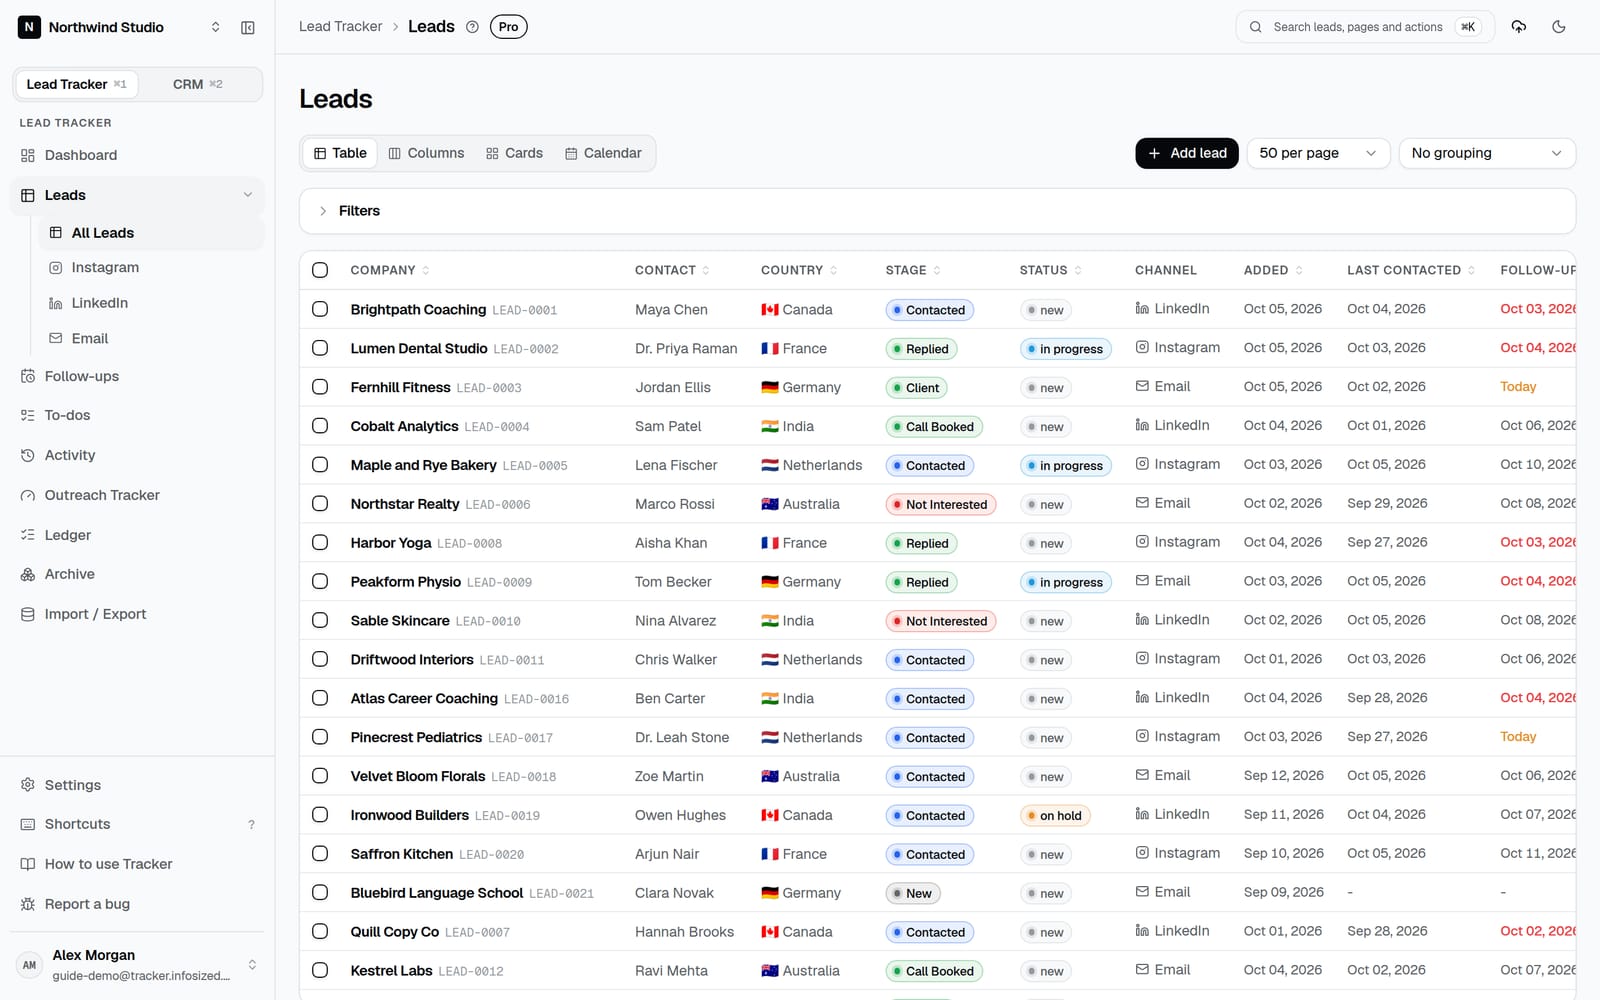
- Four views: Table, Columns (a board grouped by stage; drag a card to change its stage), Cards, and Calendar (leads placed on a date: last activity by default, or date added, last contacted or follow-up date if you pick that in Filters, Sort by; click a day to see only those leads). Press V to switch. Choose your default view in Settings, Account.
- Click a lead to open it in the side panel. The small arrow next to its name opens the full lead page.
- Activity column: when the lead was last changed. Sort by it to see what you worked on most recently.
- Search and filters: search by company, contact or lead code, and filter by stage, status, channel, sender account, country, tag, date added, "has replied" or "Loom sent". Press F.
- Sort and group: sort by any column, and group by stage, status, channel, sender account, country, tag, follow-up bucket or date added. Choose how many leads show per page.
- Bulk actions: tick several leads to change their stage or set a follow-up date for all of them at once.
Quick look side panel
Clicking a lead in a list (Leads, Follow-ups, the Dashboard, Activity or the Ledger) opens a side panel on the right instead of leaving the page. It shows:
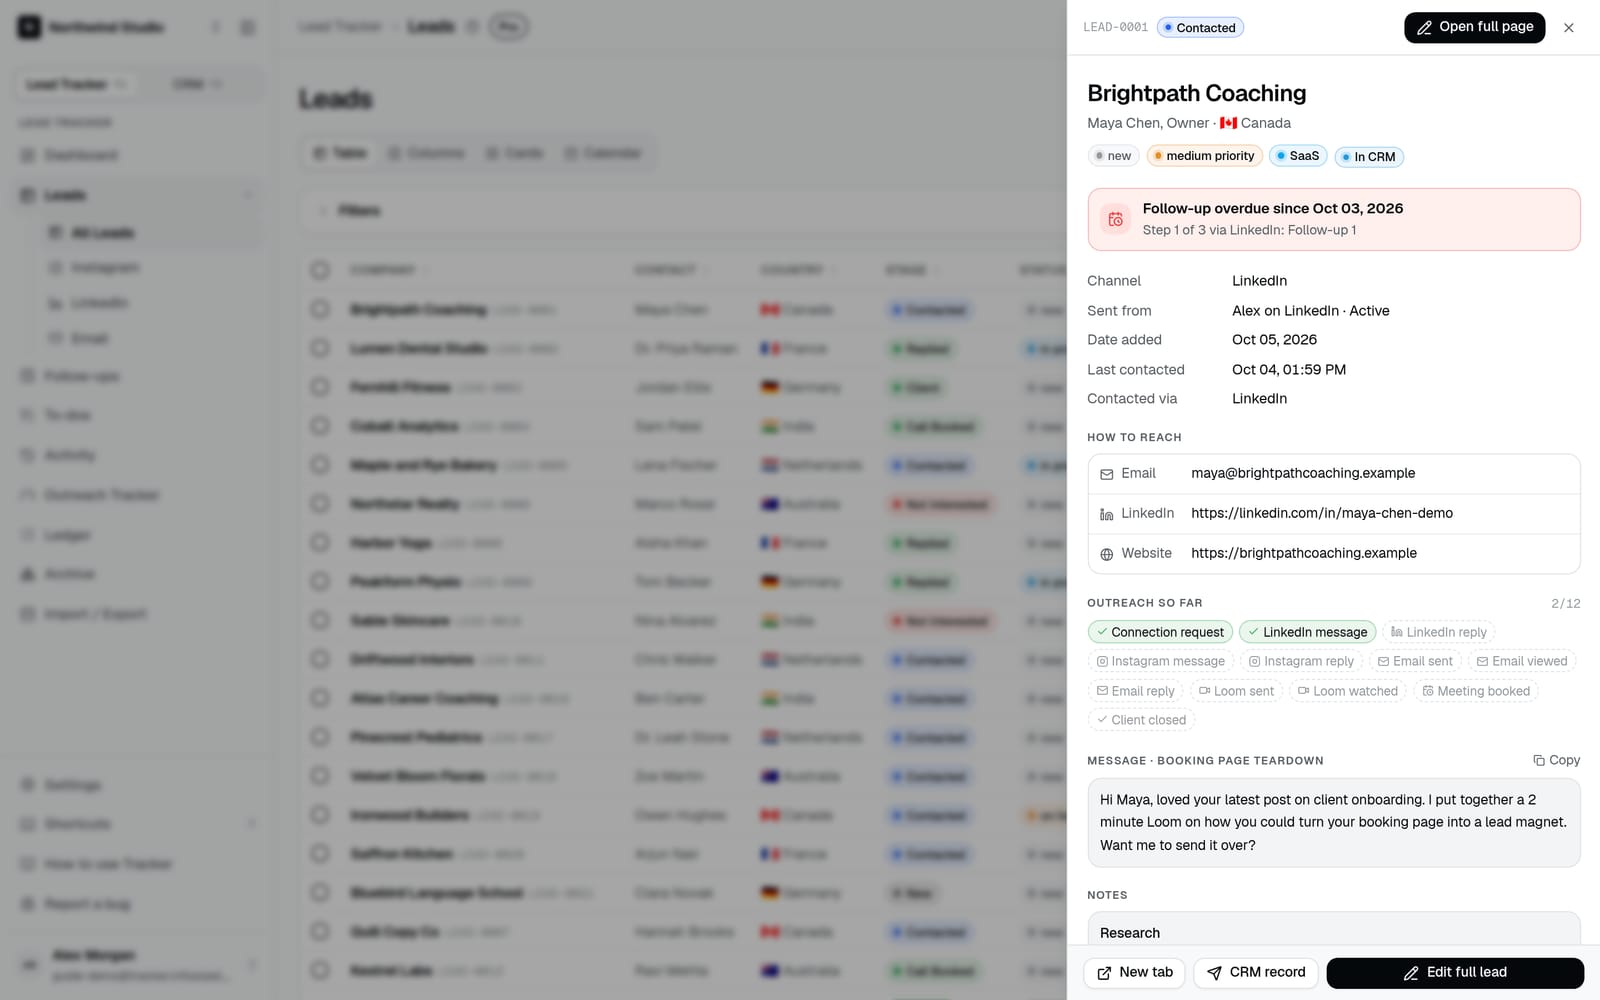
- The lead's stage, status, priority, tags, and an In CRM badge if it's already a deal.
- Its next follow-up (overdue, due today or upcoming) and which step it is.
- Channel, sender account, date added, last contacted, and where they replied.
- How to reach: every email, phone and profile link. Click a link to open it in a new tab (an email opens your mail app). Hover and click the copy icon to copy one.
- Outreach so far: which steps are done (tick) and which are not yet. Hover a done step to see its date.
- The personalized message (with a Copy button), notes, to-dos and the latest activity. Any web address in the message or notes is a link.
The panel is for reading. To change anything, click Open full page or Edit full lead, or New tab to keep your list open. Press Esc or click outside it to close it.
Make it wider or narrower: drag the panel's left edge. Tracker remembers the width on this device. Double-click the edge to go back to the normal width.
Rapid entry (Instagram, LinkedIn, Email)
The fastest way to add leads while you prospect. Open Leads, Instagram (or LinkedIn, or Email):
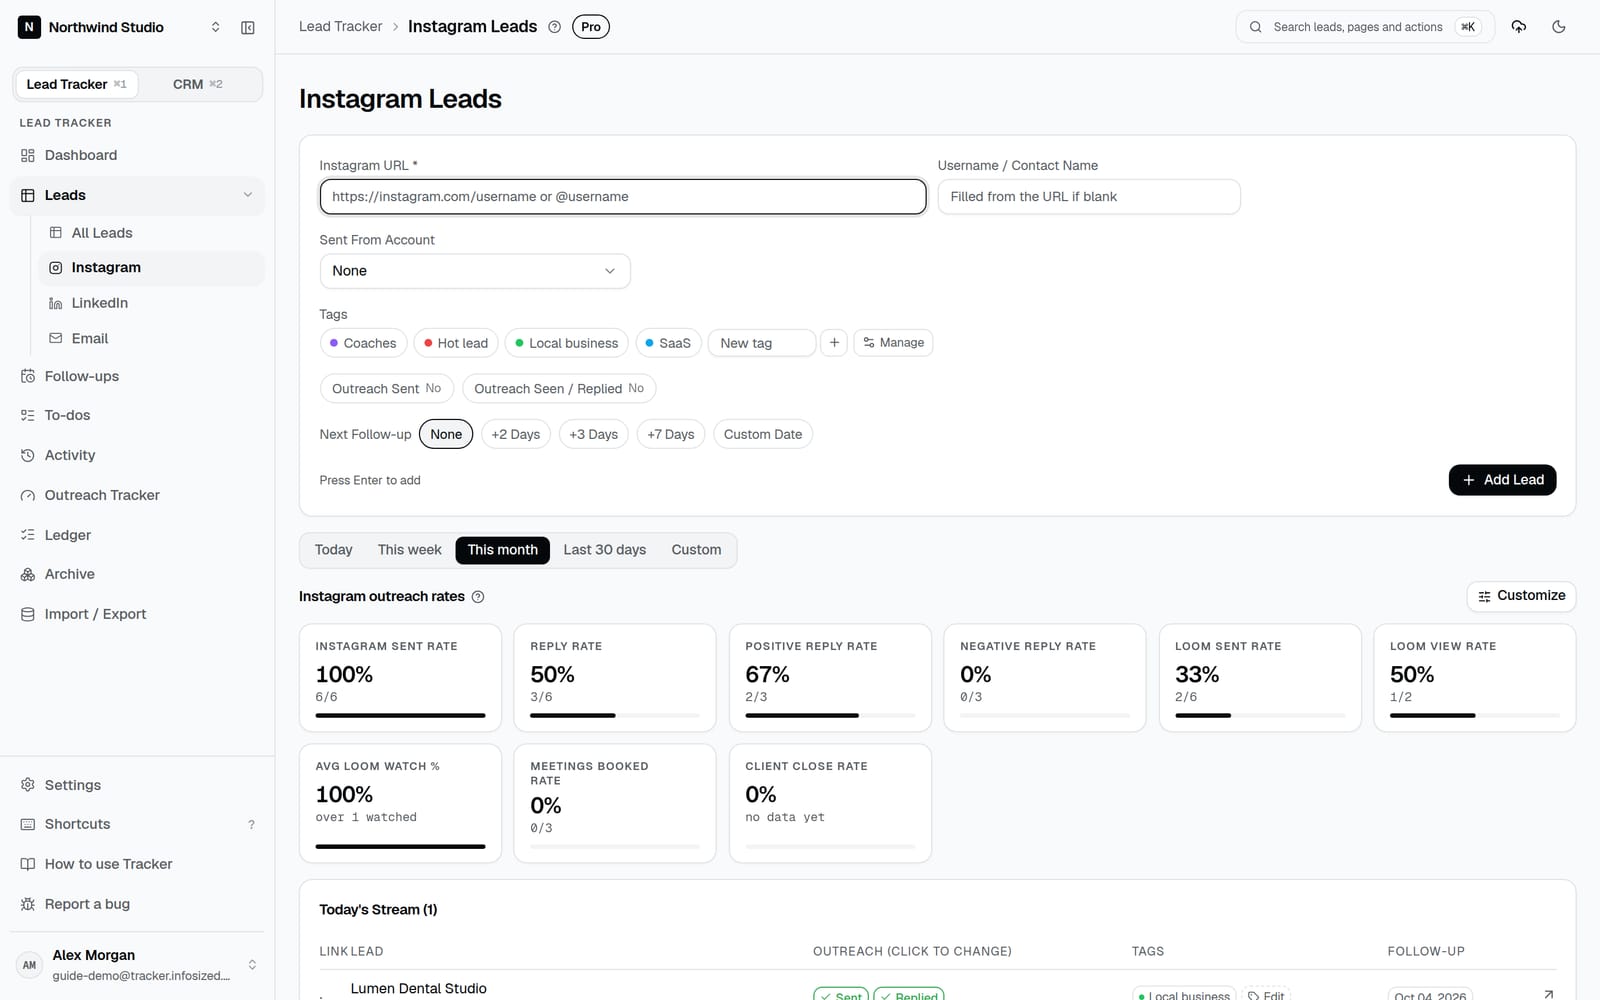
- Paste the profile link (or email address). Tracker reads the handle, name or company from it.
- Tick what you've already done, like Outreach sent or Connection request sent.
- Pick the outreach template you sent, if you use outreach templates. You see it filled in with the lead's name; click Copy to paste it into your DM or email.
- Pick the sender account, tags and a follow-up date if you use them, then press Enter.
The follow-up date you pick (like +3 Days) becomes follow-up #1 on the lead, so you can see it and change it on the lead's page. The template you picked is saved on the lead too, with the message filled in.
To plan the whole sequence at once, use Follow-up Template under Next Follow-up and pick one of your follow-up templates instead of a date. Each step becomes a follow-up on the lead, with its days counted from today. Picking a template clears the date, and picking a date clears the template. The template stays selected for the next lead you add.
Each of these pages also shows the outreach rates for just that channel.
The lead is saved, added to your Google Sheet, and shown in today's list under the form, where you can quickly add tags. Choose which fields appear in Rapid entry settings.
Duplicate check
As you type or paste, Tracker checks whether the lead already exists, by the same email, Instagram, LinkedIn or website. If it finds one, it shows you which lead (with its code, like LEAD-0042) so you can open it instead. You can still add it anyway if it really is a different lead.
A lead's page
Open a lead's full page with Open full page in the side panel, or the arrow next to its name in the leads table. Everything saves as you type; a small "Saved" note confirms it.
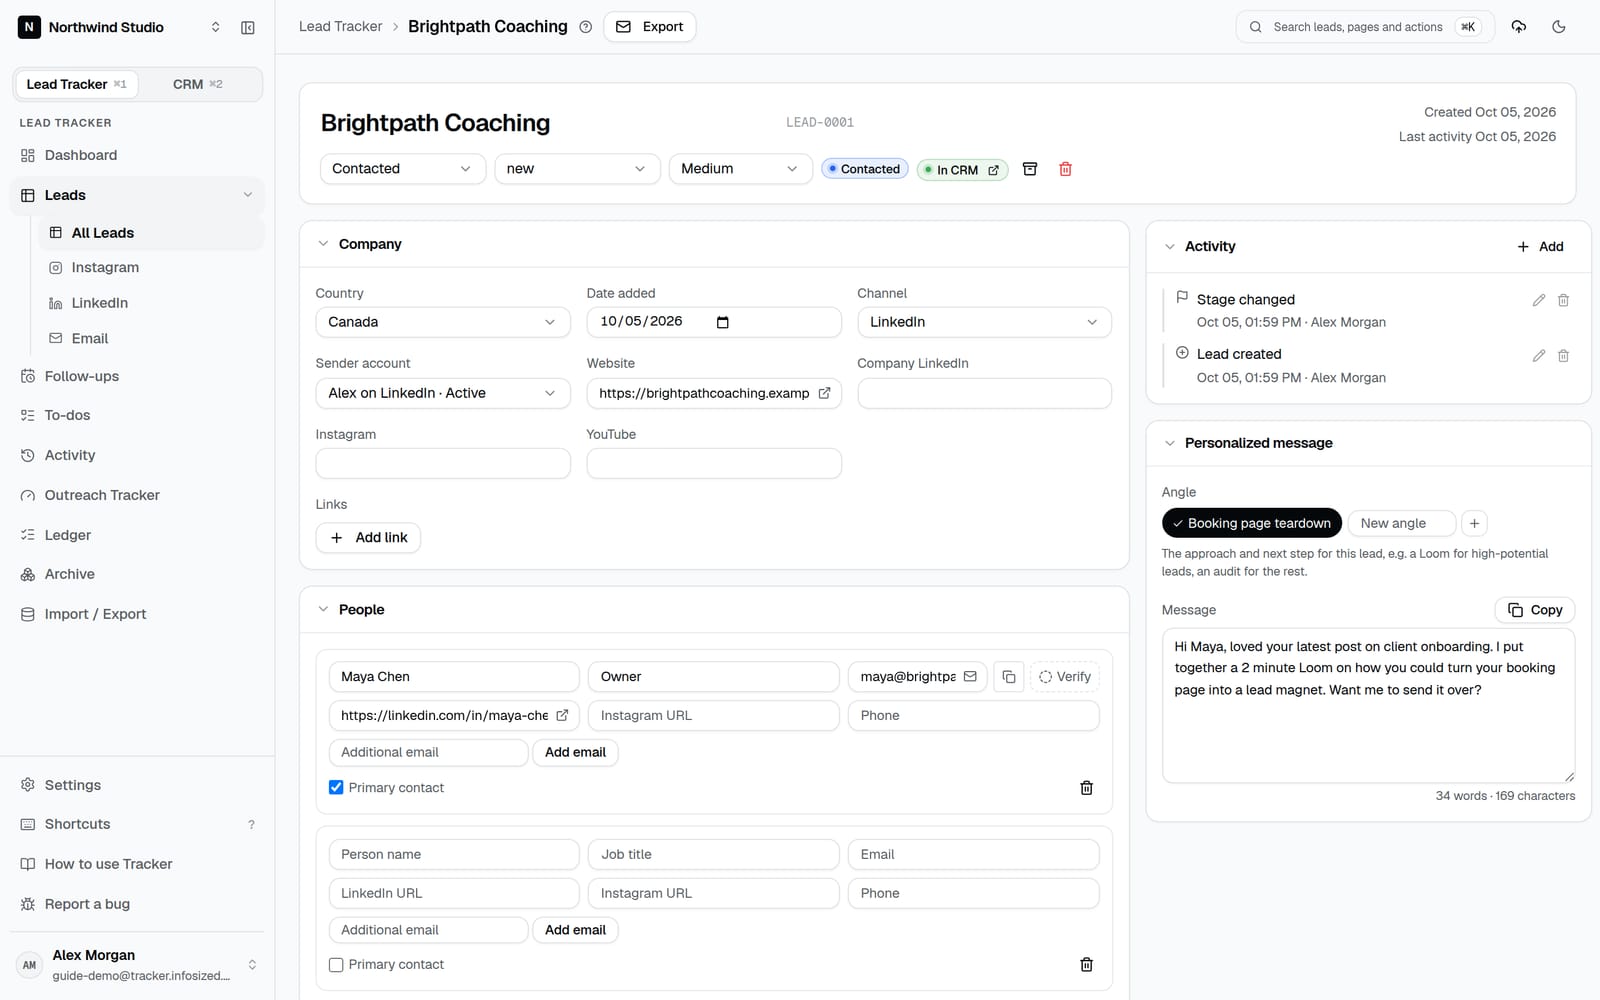
- Company: name, stage, priority, channel, sender account, country, date added, and links (website, company LinkedIn, Instagram, YouTube, plus any other links).
- People: up to 8 contacts per lead, each with name, job title, emails, LinkedIn, Instagram and phone.
- Outreach: tick boxes for each step on each channel (email sent, viewed, replied; LinkedIn connection, message, reply; Instagram message, reply), with the date of each.
- Loom: your Loom link, whether it was sent and watched, and how much was watched.
- Outcome: reply sentiment (positive, neutral, negative), meeting booked, client closed.
- Follow-ups: numbered follow-up rows (five to start, add more if you need them), each with a date, channel, the message template you sent, a Sent tick and notes. See Follow-ups.
- Personalized message: pick an outreach template or write the message for this lead, and note the angle you used.
- Tags, Research and notes, and Activity (a timeline of everything that happened to this lead).
You can also email the lead's details to yourself, archive it, push it to the CRM, or delete it permanently.
Automatic stage changes
Tracker moves leads forward for you so the stage always matches reality:
- Mark outreach as sent on any channel and a new lead moves to Contacted.
- Mark a reply and the lead moves to your reply stage (set which stage that is in Stages).
- When the reply is positive, the lead is also added to the CRM.
Stages only ever move forward automatically. Leads already won or lost are never changed.
Follow-ups
Most replies come from follow-ups, not the first message. The Follow-ups page lists every follow-up that isn't sent yet, in three groups: Overdue, Due today and Upcoming (next 14 days).
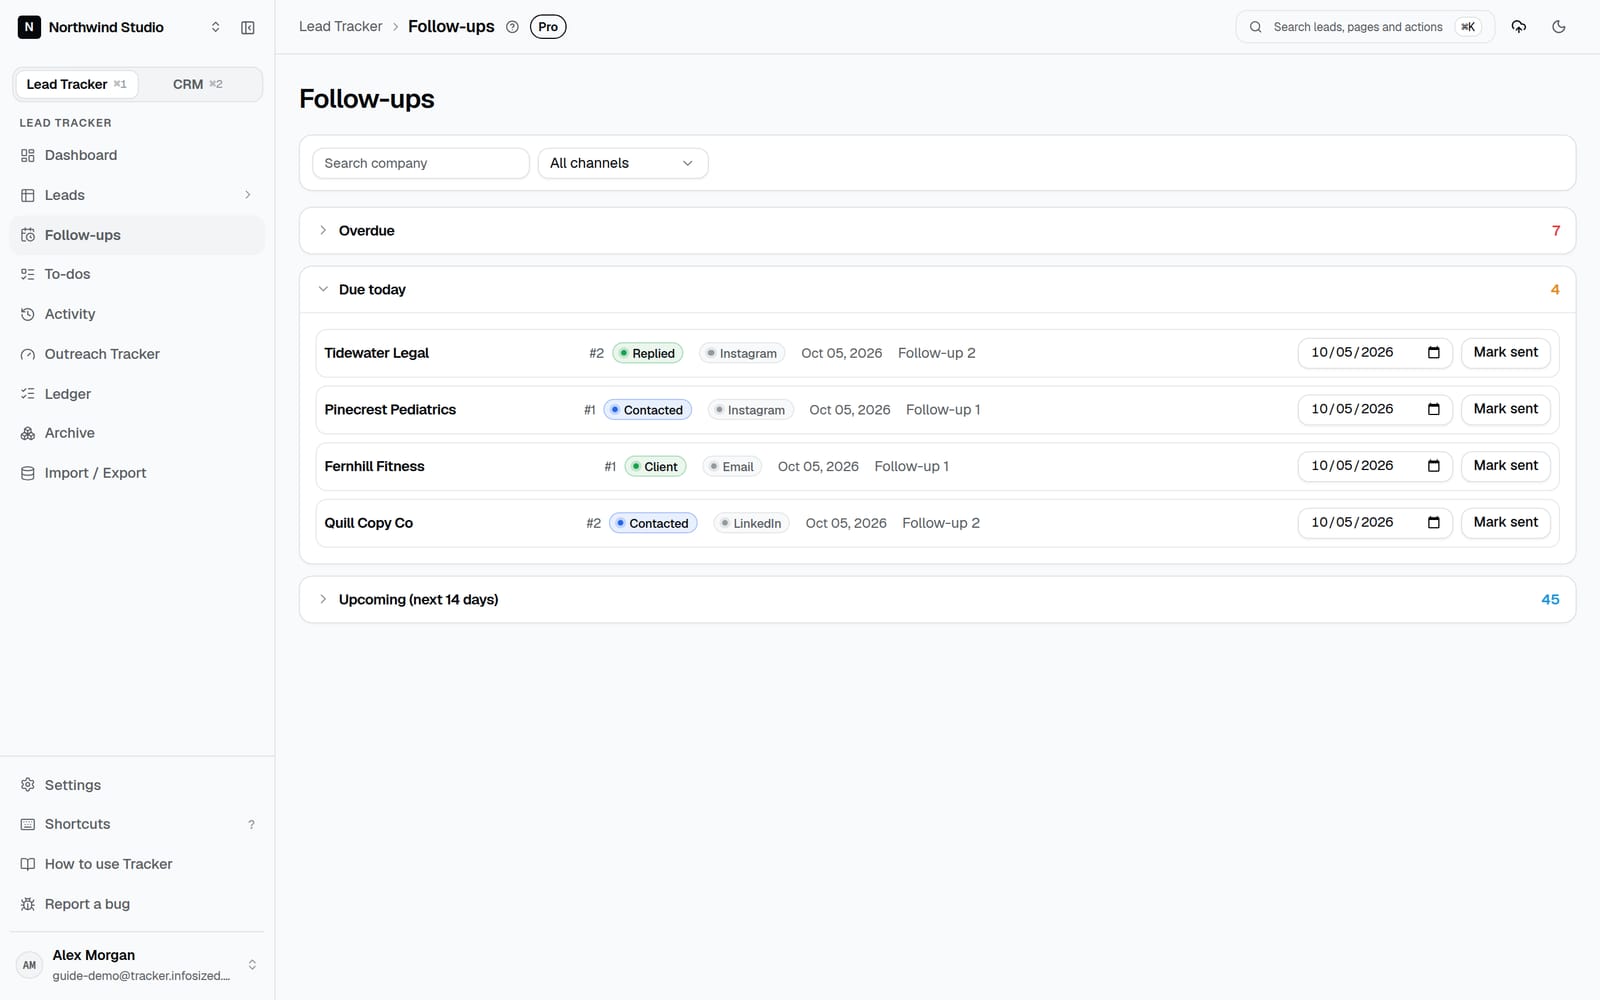
- Mark sent when you've sent it.
- Change the date with the date box to reschedule.
- Snooze when it's not the right time: pick Tomorrow, In 3 days or In 1 week. It leaves the list and comes back on that day.
- Snooze, Stop follow-ups for this lead when you don't want to message that lead again. See Stopping follow-ups below.
- Hover over a cut-off note to read it in full; click the company to open the lead in the side panel.
How follow-ups work. Every lead has numbered follow-ups (#1, #2, and so on) on its page. Each one has a date, a channel, the message you sent, a Sent tick and notes. The lead's next follow-up (shown in lists and on the dashboard) is always the earliest follow-up that isn't sent yet. A follow-up date you set anywhere else, like Rapid entry, an import or your Google Sheet, is added to the lead's follow-ups, so you can always see and edit it on the lead's page.
On a lead's page:
- Type or pick a date in a row; it saves straight away.
- Click +2 days, +3 days or +7 days to fill the next empty follow-up from today.
- Pick the outreach template you sent for that follow-up, and copy it with the copy icon.
- Tick Sent when it's done. The card's header shows the next follow-up date.
- Apply template fills several follow-ups at once from a follow-up template; Clear all empties them.
Stopping follow-ups
Some leads should not get more messages. You don't need to delete their follow-ups or rename a stage.
- It happens on its own when you move a lead to a Lost, Won or Replied stage, or archive it. Its follow-ups stay on the lead but stop showing as due, here and on the dashboard. Move the lead back to an active stage and they come back.
- Stop follow-ups on a lead's page (or from Snooze on this page) stops them by hand, for example when someone asks you not to message again. Nothing is deleted: the follow-ups stay on the lead, faded.
- Resume follow-ups on the lead's page brings them back.
To-dos
Small tasks linked to a lead, like "find the founder's email" or "check their latest reels". Add a to-do on a lead or on the To-dos page, give it a due date and an owner, and tick it off when done. Overdue ones are highlighted.
Activity
A live feed of everything that happened across your leads: leads added, stages changed, messages sent, replies, notes, follow-ups and more, with who did it and when. Useful for seeing what your team did today.
Outreach Tracker
Shows how many messages you sent each day on each channel, against your daily target.
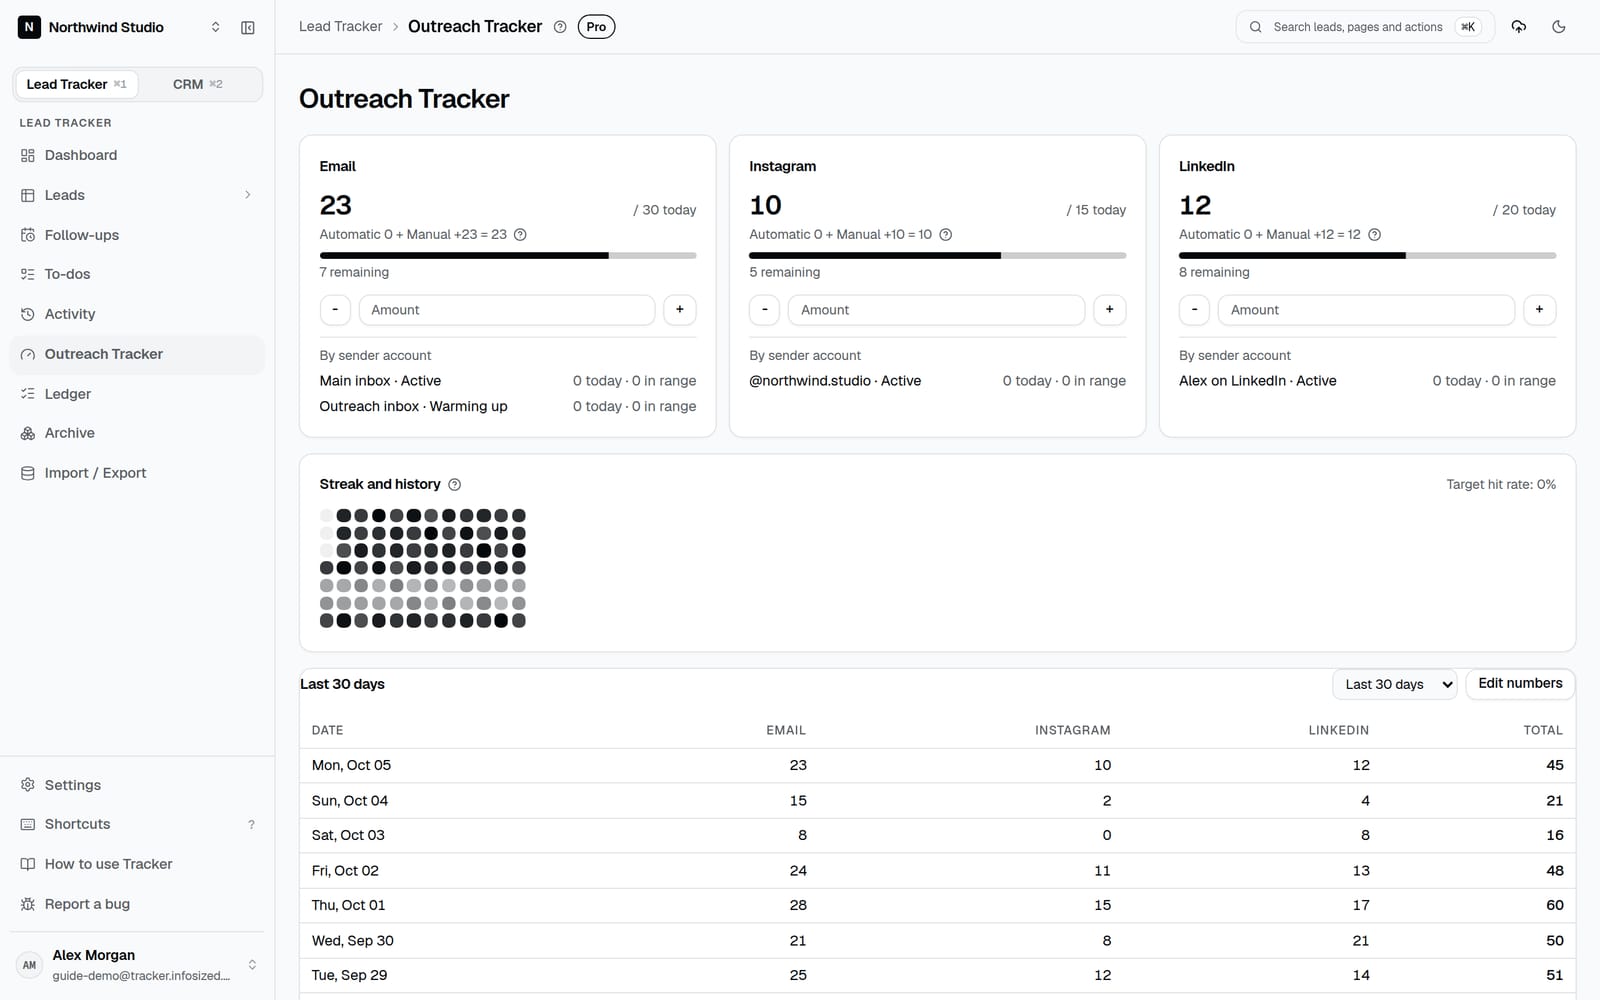
- Channel cards (Email, Instagram, LinkedIn): today's count, your target, a progress bar, and the split by sender account (today and over the range).
- + and - buttons: add or remove outreach you did outside Tracker, for today.
- Streak and history: a grid of the last 12 weeks; darker squares mean more outreach. Target hit rate is the share of days you met your combined target.
- History table: daily counts for the last 30 days or 12 weeks. Click Edit numbers to correct any past day: type the real number and click away to save.
Automatic vs manual counts
Automatic counts come from your leads: every time you mark outreach as sent on a lead, it counts for that day and channel. Manual is what you add yourself with the + and - buttons, or by editing a past day.
The card shows the sum, for example "Automatic 12 + Manual +5 = 17". When you edit a past day, Tracker records the difference as a manual adjustment, so the day shows exactly the number you typed. Each person's manual counts are their own.
Ledger
A log of every outreach and conversion event (lead created, email sent, reply, meeting booked, client closed, pushed to CRM and more), grouped by day, week, month or year. Use it to answer questions like "how many meetings did we book in August?". You can delete a wrong entry.
The cards at the top count the period you picked, compared with the one before: leads added, outreach sent, replies, meetings booked and clients closed, plus cards for each channel (Instagram DMs sent, emails sent, LinkedIn messages and connections sent, and replies per channel). Click Customize to show or hide cards. At first you see the channels you picked when you set up Tracker.
Above the list, filter by event (outreach sent, replies, meetings booked, clients closed, leads added, stage changes) and by channel. Export CSV exports what the filters show.
Archive
Archive leads that are done (not interested, wrong fit) to keep your lists clean without losing them. Archived leads don't count as active and don't show in your lists. Search the Archive by company or lead code, and restore a lead any time.
Import and export
Go to Lead Tracker, Import / Export.
- Upload a file (CSV or Excel): drag it onto the box or click to choose it.
- Paste from your sheet: select cells in Google Sheets or Excel (with the header row), copy, and paste.
- Download template: an Excel file with Tracker's columns, examples, and a tab explaining each column.
Your column names don't have to match. Tracker matches them for you and you can fix any match before importing. It remembers your choices for next time. Cells with an email plus a name and role (like "kate@acme.com | Kate, COO") are split automatically.
Export downloads all leads or all CRM records as CSV.
Cleaning a messy sheet with AI
If your sheet is very messy (several tabs, mixed columns, notes everywhere), click Copy AI prompt on the import page, paste it into ChatGPT or Claude, and attach your spreadsheet.
- The AI first reports what it found (tabs, how many real leads, how it will map your columns) and asks a few questions, each with a recommended answer.
- Answer them (or reply "go with your recommendations").
- It gives you a clean CSV. Save it as a .csv file, or copy it, and import it.
The prompt includes your own stage and channel names, so the result matches your workspace.
One-click lead clipper
A browser bookmark that saves the page you're on as a lead. Set it up once in Settings, One-click lead clipper by dragging the button to your bookmarks bar. Then, on someone's Instagram or LinkedIn profile or any website, click the bookmark: a small window saves it as a lead and warns you if it already exists.
How leads get into the CRM
The CRM only holds real opportunities. A lead becomes a CRM record (a "deal") when:
- you mark a positive reply on the lead (automatic), or
- you push it yourself from the lead's page, or press P.
The deal starts in your first CRM stage (usually New Reply). The lead stays in the Lead Tracker too, with all its history.
CRM Dashboard
Use the filter bar at the top and the dropdowns on each card to see exactly what you want. See Filters and card dropdowns.
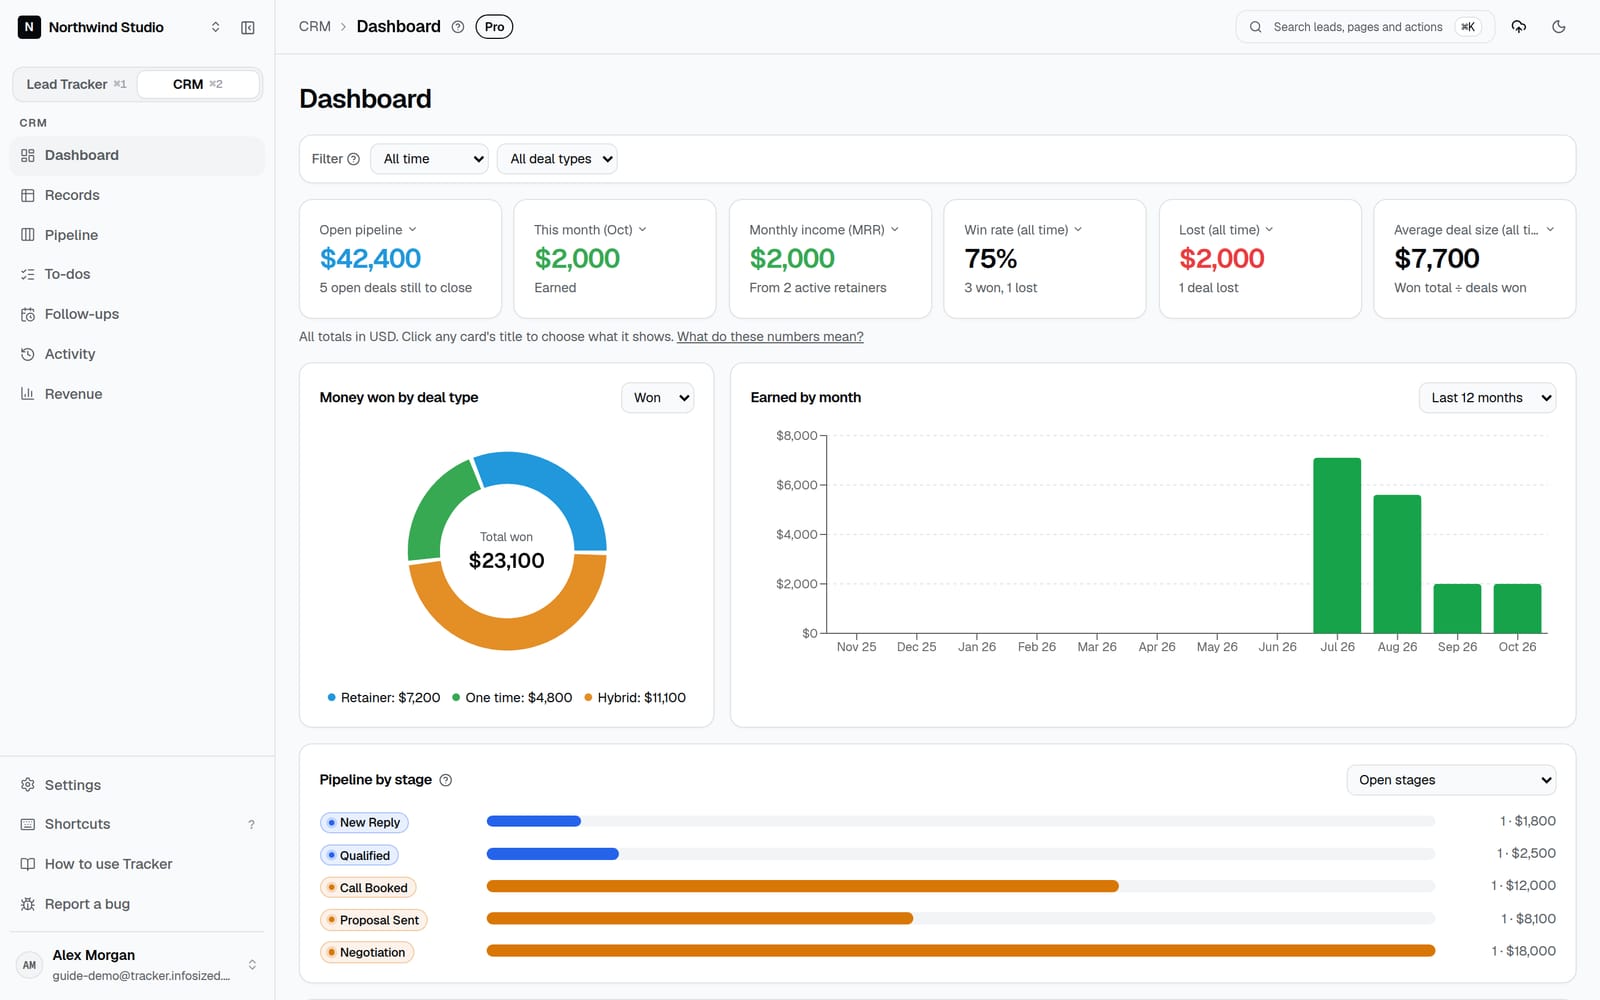
- Open pipeline, Earned this month, Monthly income (MRR), Win rate, Lost and Average deal size. Each is explained in the Revenue sections below, and they are worked out exactly the same way as on the Revenue page.
- Money by deal type: split into one time, retainer and hybrid. Its dropdown switches between won, open and lost deals.
- Earned by month: money earned each month. Its dropdown switches between the last 12 months and this year.
- Pipeline by stage: how many deals and how much money sit in each stage. Its dropdown shows open stages only, or all stages including won and lost.
- Recent records: your latest deals. Its dropdown shows the newest, the newest open, or the most recently won.
All totals are in your CRM currency (US dollars unless you change it). See Currencies.
Records and a deal's page
Records lists every deal, with filters for stage, owner, priority, deal type and value range. Open a deal to edit:
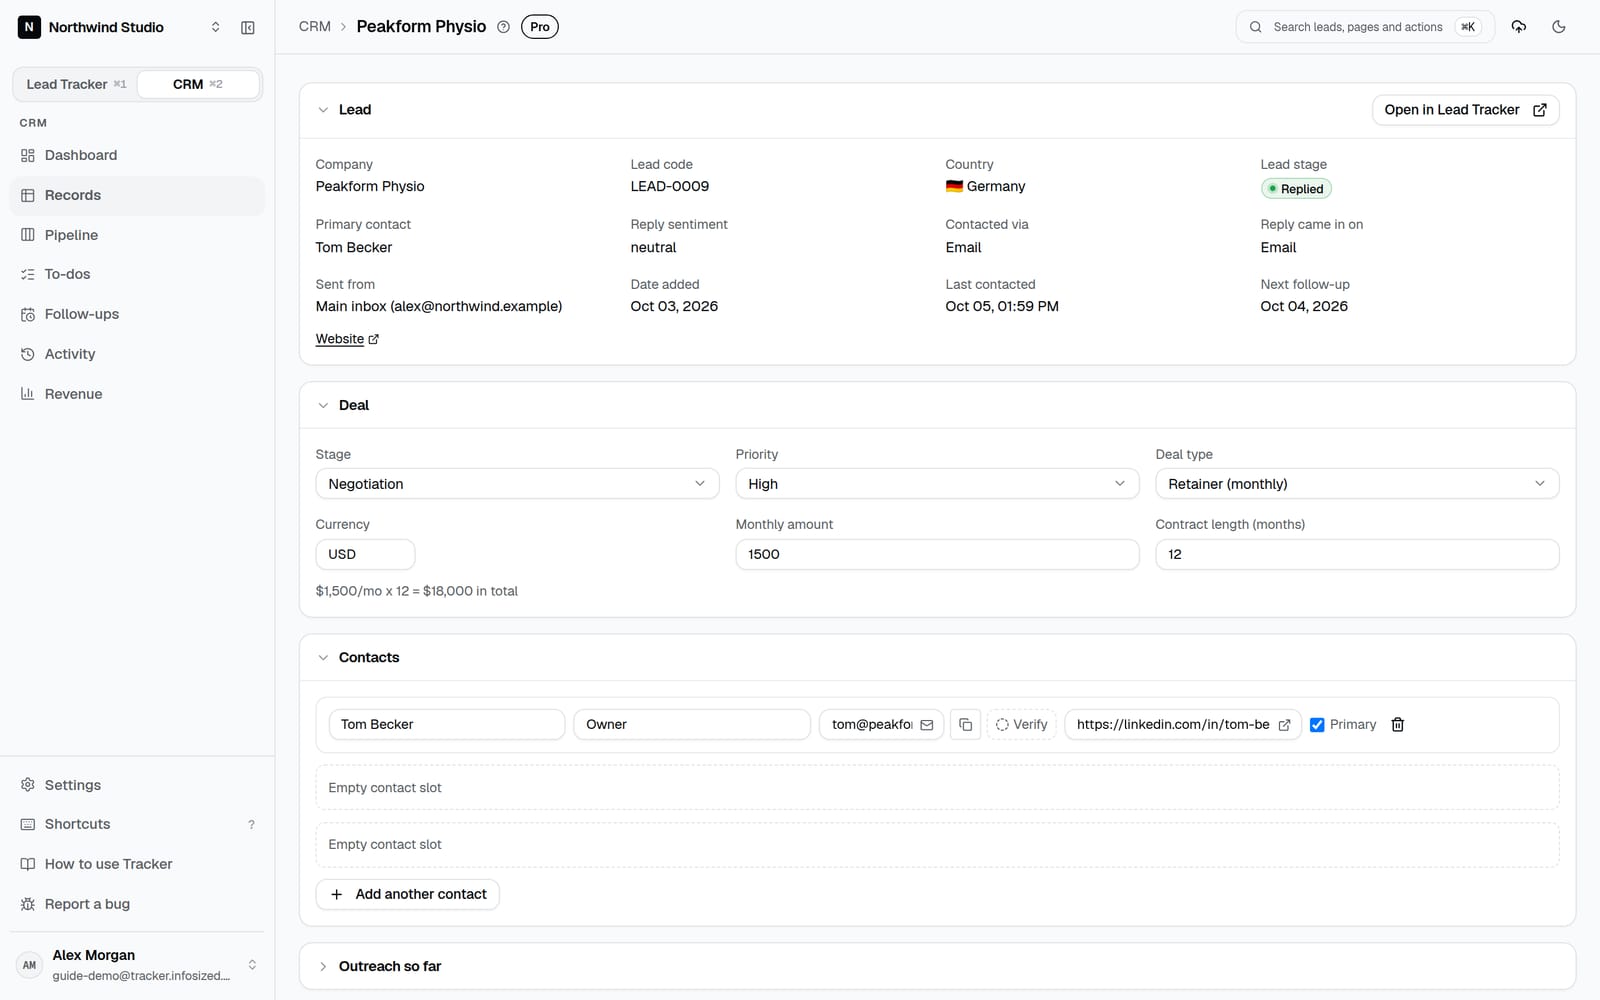
- Deal type: one time, retainer or hybrid. The money fields change to match. See Deal types.
- Currency: the currency this client pays in.
- Expected close date, next follow-up, owner, priority and notes.
- Contact log: record each conversation as inbound (they reached out) or outbound (you did), with a short summary.
Under the fields, the deal page shows the deal's amounts and its total, for example "$500 + $1,000/mo x 6 = $6,500 in total".
Pipeline board
Your deals as cards in columns, one column per CRM stage, with the total value at the top of each column (in your CRM currency). Each card shows the deal's amounts, for example "$1,000/mo x 6" for a retainer. Drag a card to move it to another stage.
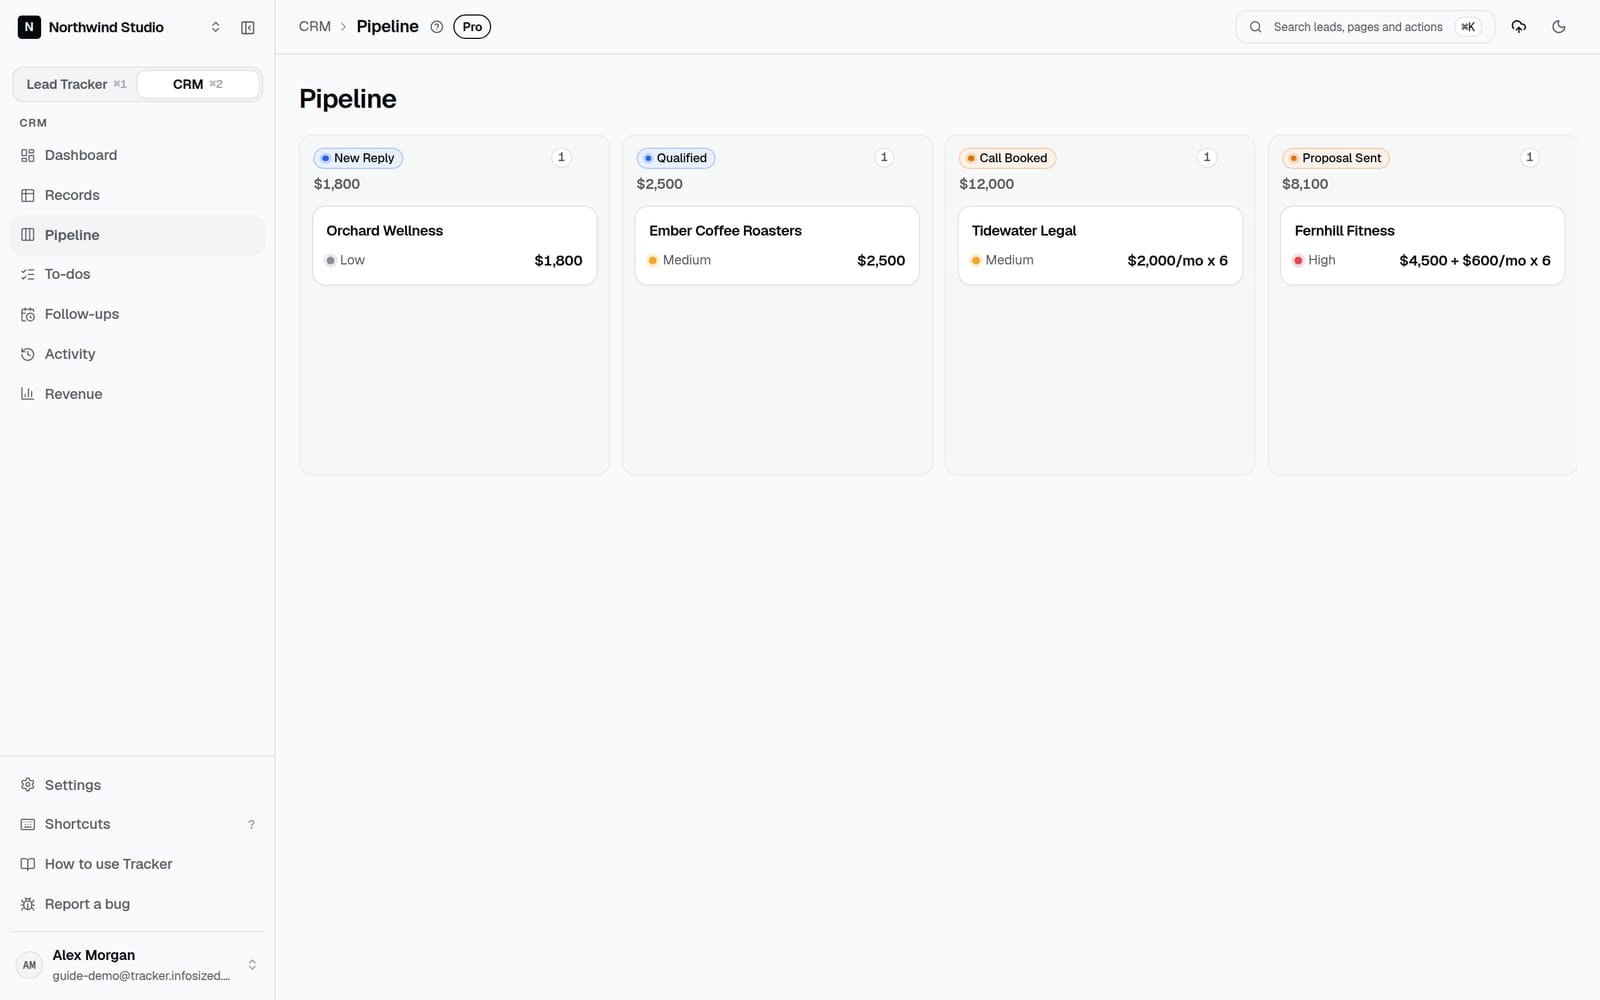
- Dropping a deal on a won stage asks for the final value, records the close date, and locks the exchange rate for that day.
- Dropping it on a lost stage asks for a one-line reason, so you can learn from it later.
You can hide stages you don't use from the board; they appear in a "Hidden stages" panel.
CRM follow-ups and to-dos
CRM, Follow-ups lists deals by their next follow-up date: overdue, due today and the next 7 days. For each one you can:
- Log a contact (inbound or outbound, with channel and summary), which updates "last contacted".
- Snooze it by a few days if now isn't the right time.
CRM, To-dos works like the Lead Tracker to-dos, for tasks linked to deals.
Revenue page
Everything about money in one place, in plain numbers: what you've won, what's still open, what you lost, and what's coming in each month. The sections below explain each number. All amounts are in your CRM currency.
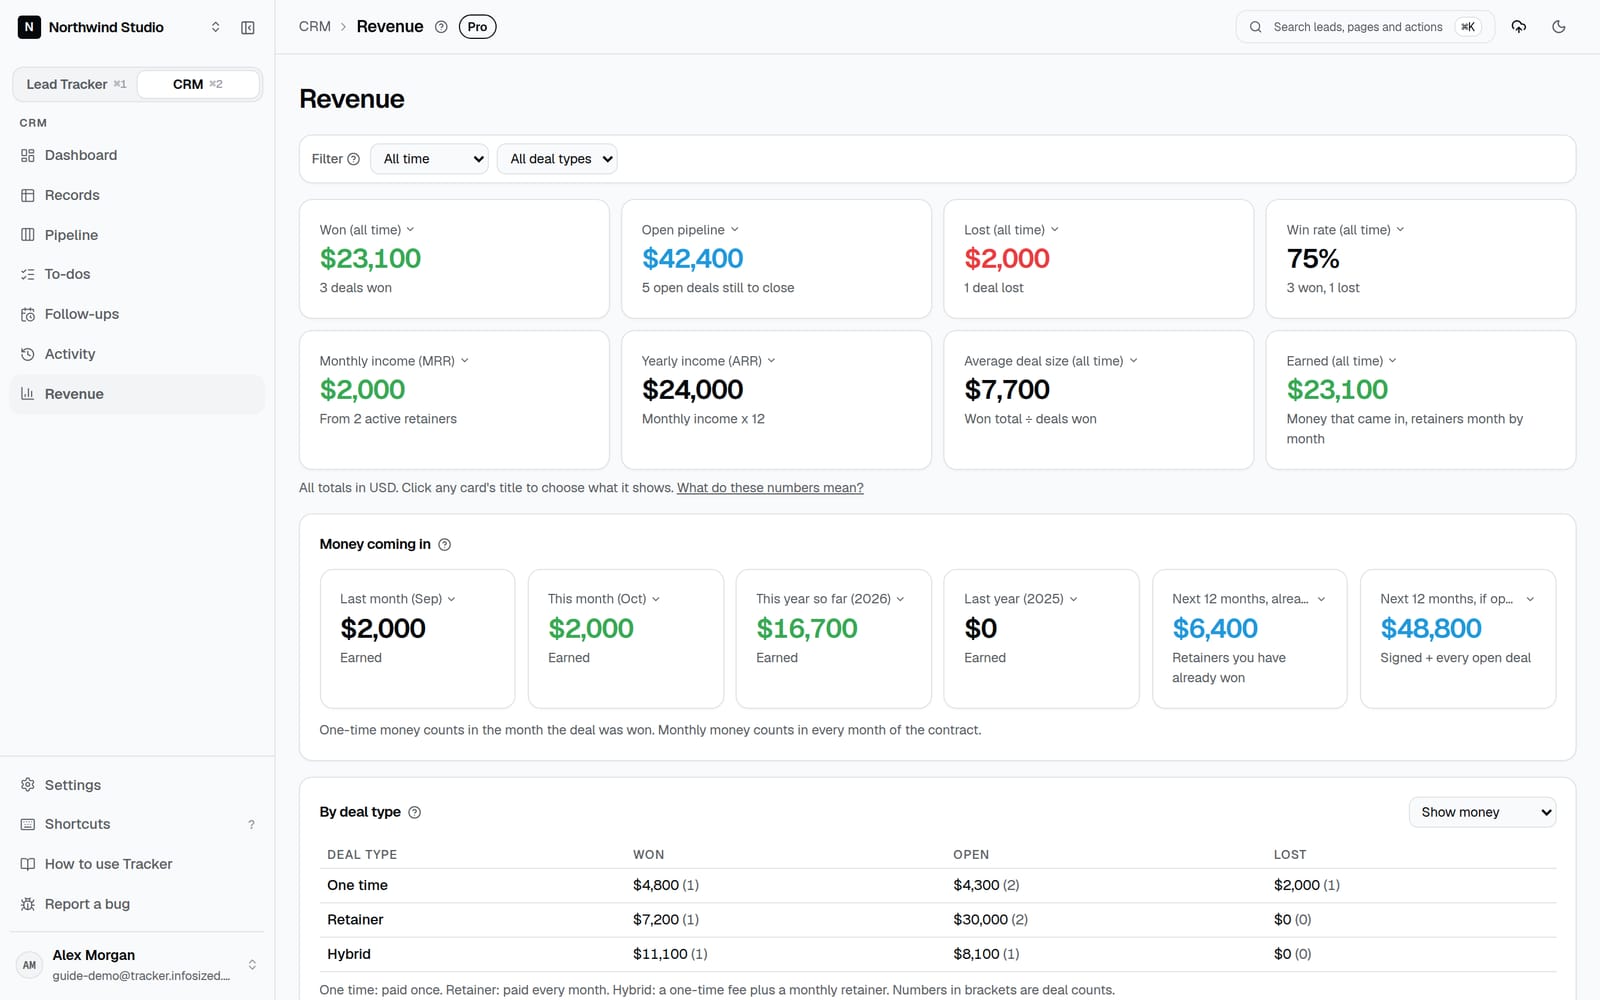
Use the filter bar and the card dropdowns to choose what you see (see Filters and card dropdowns). By default the top row shows Won, Open pipeline, Lost, Win rate, Monthly income (MRR), Yearly income (ARR), Average deal size and Earned.
Filters and card dropdowns
The CRM Dashboard and the Revenue page each have a filter bar at the top:
- Period: All time, This month, Last month, This year, Last year, or any month you pick. It filters won and lost deals by the month they closed. Open deals haven't closed yet, so they always show.
- Deal type: one time, retainer or hybrid.
- Owner (when your team has more than one person): see one person's deals.
- Clear resets everything.
Every number card has a dropdown in its title. Click the title to choose what that card shows, for example swap "Average deal size" for "Deals lost" or "Last year". Totals and win rate follow the period. Money that comes in over time (monthly income, this month, this year) always counts every won retainer, so a retainer won last year still counts for the months it pays.
The other cards have a dropdown at the top right: show money or deal counts, sort stages, switch between won and lost deals, and more. Your filters and choices are remembered in this browser.
Open pipeline, won and lost
Every deal is in one of three states, and each one has a total:
- Open pipeline: deals not yet won or lost, at full value. It answers "how much money is still in play?" If every open deal closed, this is what you'd add.
- Won: the total of every deal you've won.
- Lost: the total of every deal marked lost, so you can see what slipped away.
A deal's value is its full total: a one-time deal is its price, a retainer is monthly x months, and a hybrid is its fee plus monthly x months.
Open deals by stage (Revenue page) shows how many open deals sit in each stage, their total, and the average days since they were last updated. Its dropdown sorts by most money, most deals, or longest waiting. Deals sitting a long time need attention.
Deal types: one time, retainer, hybrid
- One time: the client pays once, for example a $2,000 website. Fill in the deal value.
- Retainer: the client pays every month, for example $1,000 a month for 6 months. Fill in the monthly amount and contract length. The total is worked out for you: $6,000. Leave the contract length blank for an ongoing retainer, and Tracker counts it as 12 months.
- Hybrid: a one-time fee plus a monthly retainer, for example a $500 setup fee and then $1,000 a month for 6 months. Total: $6,500.
The By deal type table on the Revenue page shows how much you've won, have open and have lost for each type, with deal counts in brackets. Its dropdown switches to deal counts only.
Monthly and yearly income (MRR, ARR)
- Monthly income (MRR): what clients are paying you every month right now. It adds up the monthly amount of each won retainer and hybrid deal whose contract is still running this month. A 6-month retainer stops counting once its 6 months are over.
- Yearly income (ARR): monthly income x 12. It's a simple "if this kept going for a year" number.
One-time deals never count here, because they don't repeat.
Win rate and average deal size
Win rate: deals won out of all finished deals (won plus lost). Open deals don't count yet. 3 won and 1 lost is a 75% win rate, and the card shows "3 won, 1 lost" underneath.
Average deal size: the total you've won divided by how many deals you've won.
Money coming in: month, year, next 12 months
This section answers "how much money did I make?" and "how much is coming?".
- Last month and This month: money earned in that calendar month.
- This year so far: money earned from January until now. Last year: the full previous year.
- Next 12 months, already signed: retainer and hybrid payments you've already won that fall in the coming 12 months.
- Next 12 months, if open deals close: the signed amount plus every open deal, as if you won them all.
How money is counted: one-time money counts in full in the month the deal was won. Monthly money counts in each month of the contract. A $1,000/month retainer for 6 months won in September counts $1,000 in September, October, and so on until February, not $6,000 in September. A hybrid deal counts its fee in the month it was won, plus its monthly amount each month.
For these numbers to be right, mark deals won when they actually close, and fill in the deal type, monthly amount and contract length.
Revenue by month and won deals
Revenue by month shows all 12 months of a year. Pick the year with the year menu. For each month you see money earned (green) and money that could come in from open deals, starting from their expected close date (blue), with a total row for the year. Open deals with no expected close date are listed in a note under the table.
The chart's dropdown can hide open deals to show earned money only.
Won deals lists the deals you've won, with their type, amounts and total. Its dropdown switches to Lost deals. The list follows the filter bar, and shows how much you earned in the chosen period. Export CSV follows what you see.
Currencies
Each deal keeps its own currency (an Indian client stays in rupees, a UK client in pounds). All CRM totals and charts are shown in one currency: your CRM currency. It is US dollars by default. The workspace owner can change it in Settings > CRM currency, for example to INR if most of your clients pay in rupees. Then a deal from a US client is converted into rupees for your totals.
Use the standard 3-letter code for a deal's currency, like USD, INR, GBP, EUR, CAD or AUD.
- A deal already in your CRM currency is never converted, and shows no exchange rate note.
- Won deals are locked. When a deal in another currency is marked Won, Tracker saves that day's exchange rate. Revenue, earnings and every month or year view use that closing rate, not today's.
- If you edit a won deal's value later, the new amount is converted at the same closing rate. The deal page shows a note reminding you of this.
- Amount received: on a won deal in another currency, you can type exactly how much reached your account in your CRM currency. That amount is used instead of the converted one. Clear it to go back to the closing rate.
- Open deals (not won yet) use today's rate, so their value can move a little until they close. Reopening a won deal removes the lock.
Stages
Stages are the steps a lead or deal goes through. There are two lists: Lead stages (like New, Contacted, Replied, Call Booked) and CRM stages (like New Reply, Qualified, Proposal Sent, Won, Lost).
- Rename, recolour, reorder, add or delete stages. Before deleting a stage that has leads, Tracker asks you to move them.
- Reply stage: where a lead moves automatically when you mark a reply.
- Won and Lost: mark which stages mean the deal is finished. They power win rate, earnings and revenue.
Channels and sender accounts
Main outreach channels (at the top of this section): where you send most of your outreach from, picked when you set up your workspace. Click Email, Instagram or LinkedIn to switch it on or off. The dashboard uses this to choose which outreach rates to show first. Only the owner and admins can change it.
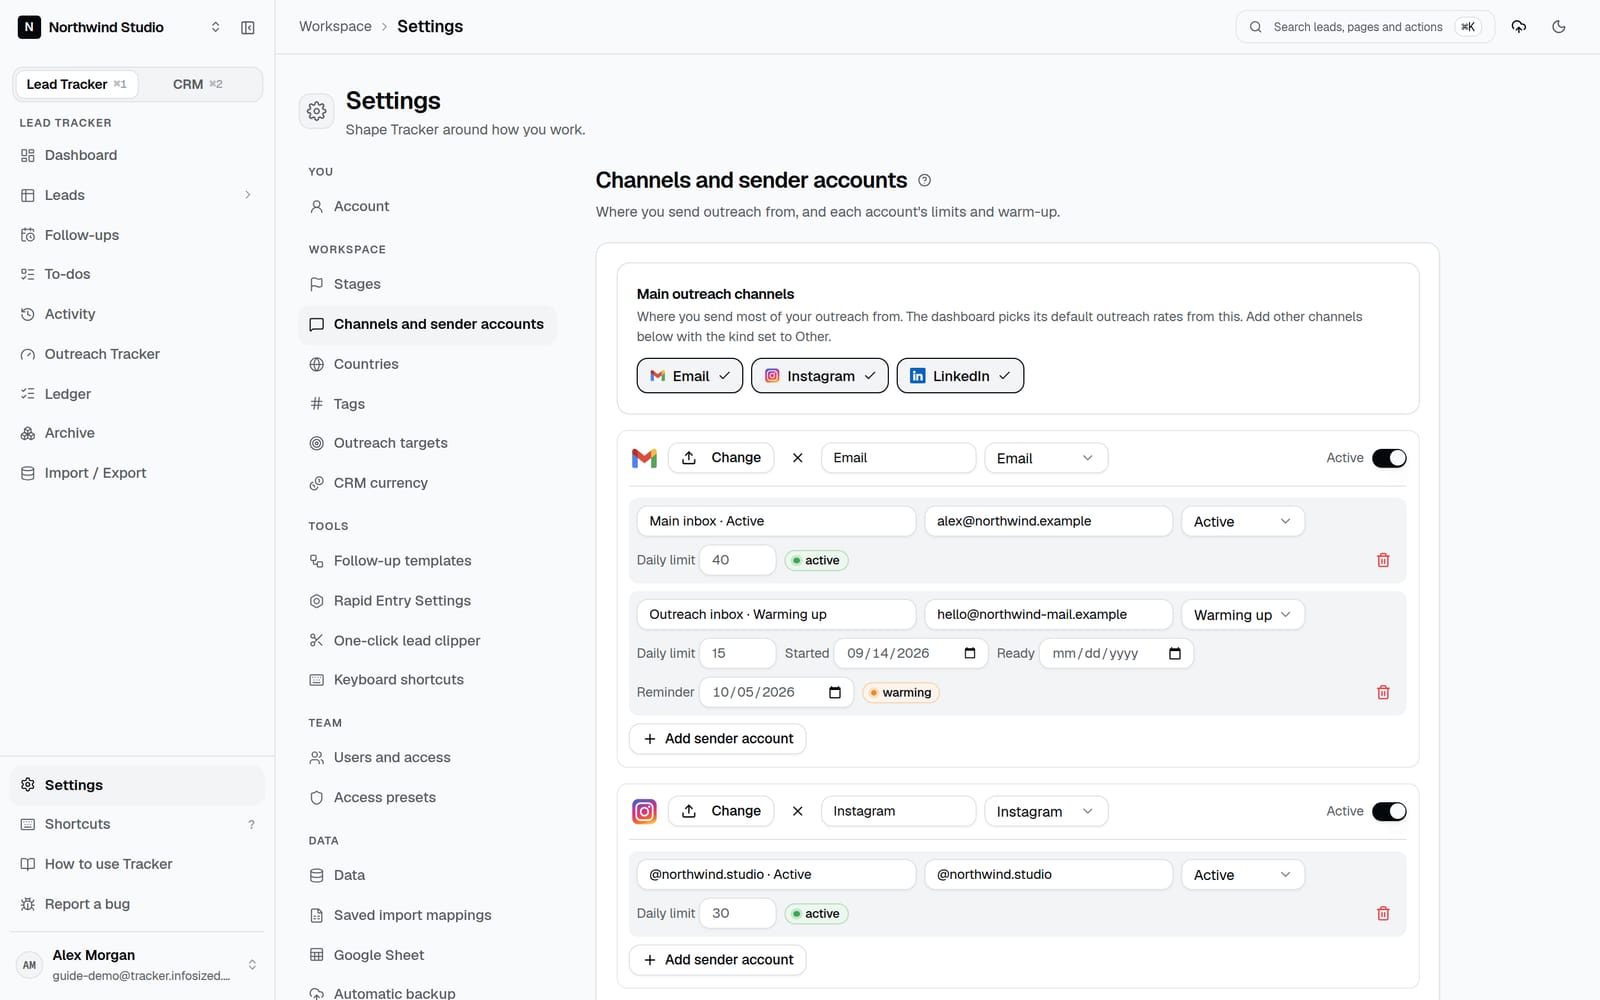
Channels are where you reach people: Email, LinkedIn and Instagram are set up for you, with their logos. Add others (WhatsApp, X, phone) with the kind set to Other, and upload an icon for each. Channels you typed in when setting up are added here for you, and each one gets its own outreach rates on the dashboard.
Sender accounts are your own inboxes and profiles on each channel (for example two email inboxes and one LinkedIn profile). For each one set a label, the address, a status (Active, Warming up or Paused), a daily send limit, warm-up dates and a warm-up reminder. Choosing the sender account on a lead lets the Outreach Tracker show how much each account sent.
Outreach targets
Your daily goal for each channel, for example 30 emails, 20 LinkedIn messages and 15 Instagram DMs. The Outreach Tracker compares each day against these, and the target hit rate counts the days you met the combined target.
Outreach templates
Outreach templates are the messages you send, saved for each channel. Create as many as you like in Settings, Outreach templates: give each a name, pick its channel (Instagram, LinkedIn, Email, your own channels, or any channel) and write the message.
Use {first_name}, {name} and {company} in the message and Tracker fills in the lead's details. For Instagram, the name comes from the username or contact name, so check it before you send.
Pick a template when you add a lead in Rapid entry, on the lead's page in Personalized message, or on each follow-up. Tracker remembers which message each lead got.
Follow-up templates
A follow-up template is a schedule: a list of steps like "3 days later on Instagram, then 5 days later by email". On a lead's page, Apply template fills its follow-ups with those dates and channels in one click, counting from the day you first reached out. Create them in Settings, Follow-up templates. For the messages themselves, use Outreach templates.
Rapid entry settings
Choose which fields and tick boxes appear on the Instagram, LinkedIn and Email rapid entry forms (sender account, tags, follow-up, and each outreach tick box), and the default follow-up after each new lead: none, or in 2, 3 or 7 days.
Google Sheet and backups
Your workspace is linked to a Google Sheet in your own Google Drive. Tracker only has access to the sheet it created, never the rest of your Drive.
- New leads are added to the sheet straight away.
- Automatic backup copies everything (leads, contacts, follow-ups, CRM records) to the sheet every hour or every day, your choice. You can also click Back up now.
- Teammates you invite get edit access to the sheet.
- Disconnect Google any time; the sheet stays in your Drive.
- If Tracker loses access to your Google account, owners and admins see a bar at the top of every page: "Google is disconnected, so backups to your Google Sheet are paused". Click Reconnect Google and sign in again. Your data in Tracker is safe the whole time.
Make your changes in Tracker rather than in the sheet: backups rewrite the sheet, so edits made directly in it can be overwritten.
Team, roles and permissions
In Settings, Users and access:
- Invite by email. The person gets an email with a link to join, sent in your name; replies come to you. You can also copy the link, resend the email or revoke the invite.
- Roles: the owner (who created the workspace) and admins can manage everything; members only see the parts you allow.
- Permissions: switch on or off each part of the app per person (Lead Tracker, CRM, Revenue, Import / Export, Settings and more). Access presets save a set of permissions to reuse.
- Members can leave a workspace themselves from Settings, Danger zone.
Your account
Settings has a menu on the left, grouped into You, Workspace, Tools, Team, Data and Plan. Click a section to open it. Tracker remembers the last one you opened.
In Settings, Account: your name, a profile picture (upload one or use an image link), light or dark theme, which module opens first, your default leads view, and your password. Your theme is saved to your account, so it stays the same after you close the tab, log out, or switch devices. "Which module opens first" decides where Tracker takes you when you open it. The leads page opens in your default view; if you pick another view there, Tracker remembers it on that device until you save a new default. Keyboard shortcuts has its own section where you can change the keys.
Your menu: click your name at the bottom of the sidebar to see your email, your user ID (click to copy it, useful when you contact us), your workspace and role, and quick links to Account settings, Keyboard shortcuts, switching between light and dark appearance, and Log out.
Plan, trial and billing
- New workspaces start with a free trial: 7 days with unlimited leads.
- After that, Tracker is ₹399 per month per workspace for customers in India. Outside India, request access from the pricing page.
- Subscribe or cancel in Settings, Billing. If you cancel, you keep access until the end of the month you paid for.
- If the plan ends, your workspace pauses: nothing is deleted, and you can still back up to your Google Sheet.
Download or delete your data
In Settings, Danger zone:
- Download all my data: the whole workspace as one Excel file.
- Delete workspace (owner only) or Delete account. Tracker saves one last backup to your Google Sheet first. Deleting is permanent.
Read the Privacy Policy for exactly what is stored and removed.
Report a problem
Something not working? Click Report a problem at the bottom of the sidebar. Describe what happened, add a screenshot (or paste one), and a Loom link if you recorded one. It comes straight to us, with the page you were on.
Questions? Email sahil@infosized.co.